Author Topic: xbox one lighting mods  (Read 44750 times)

Offline Nooby Michael

  • Guppy
  • *
  • Posts: 4
  • Post quality +0/-0
  • Gender: Male
  • Just a bi
Re: xbox one lighting mods
« Reply #30 on: January 05, 2016, 02:31:18 PM »
And both of those are switched power supplys? Also i can just use any gnd right?
« Last Edit: January 05, 2016, 02:56:50 PM by Nooby Michael »

Offline Modded Matt

  • Site Owner
  • Administrator
  • Around the block
  • *
  • Posts: 4649
  • Post quality +65/-3
  • Gender: Male
Re: xbox one lighting mods
« Reply #31 on: January 06, 2016, 05:51:50 AM »
yes

Offline B4D TEMP3R

  • Guppy
  • *
  • Posts: 5
  • Post quality +0/-0
  • Gender: Male
  • Acidmods User
Re: xbox one lighting mods
« Reply #32 on: August 02, 2016, 07:33:52 PM »
I finally made some LED Mods for my controllers.
Took me a lil while to wait on the Clear Thumb Sticks but did it.

Mic port thought it looked kool i guess i also used TopBuzz LED Code.
I mainly used 0805 SMDs

Sorry for the images been Huge...


how did you do that mic port led mod? what led did you use and where did you mount it.

Offline Modded Matt

  • Site Owner
  • Administrator
  • Around the block
  • *
  • Posts: 4649
  • Post quality +65/-3
  • Gender: Male
Re: xbox one lighting mods
« Reply #33 on: August 03, 2016, 06:52:29 AM »
you have posted two different mods. The X button mod is just changing out the 0605 LED. The stick mod is prolly the same SMD leds mounted at each corner of the stick housing. I have also used 3.5mm LEDs for this as well. wire it to the controller points as posted in the pinned post.

Offline B4D TEMP3R

  • Guppy
  • *
  • Posts: 5
  • Post quality +0/-0
  • Gender: Male
  • Acidmods User
Re: xbox one lighting mods
« Reply #34 on: August 03, 2016, 12:32:04 PM »
you have posted two different mods. The X button mod is just changing out the 0605 LED. The stick mod is prolly the same SMD leds mounted at each corner of the stick housing. I have also used 3.5mm LEDs for this as well. wire it to the controller points as posted in the pinned post.
I did say the mic port led I already know how to do the other mods

Offline AssimilatorX

  • Guppy
  • *
  • Posts: 4
  • Post quality +0/-0
  • Gender: Male
  • Acidmods User
Re: xbox one lighting mods
« Reply #35 on: September 28, 2018, 10:23:51 AM »
This is my mod slightly more difficult to achieve then changing  an  0603 SMD LED. Took me a few hours of dremmeling stuff out from the frame and etc. I would not add any more LED's as they will deplete battery quicker .


Offline emcintosh

  • Guppy
  • *
  • Posts: 6
  • Post quality +0/-0
  • Gender: Male
  • On the internet, everyone knows I'm a cat
Re: xbox one lighting mods
« Reply #36 on: August 02, 2020, 10:09:16 AM »
TL;DR: what gauge of wire and route should I use to light up ABXY?

I have added LEDs to my ABXY buttons (individually switched, see 
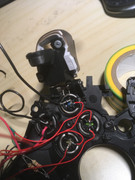
https://www.acidmods.com/forum/index.php/topic,44629.0.html), but my wiring isn't very reliable and I have had to open up the controller (unsoldering the rumble motors &c.) several times to reconnect wires that have come apart. I used what was advertised as red and black multi-stranded 30 AWG kynar wire, but when it arrived was actually two red wires, but one length of multi-strand and one of single-strand somewhat thinner wire. The single-strand seems to be 0.2 mm in diameter, and the multi-strand 0.2 to 0.4 mm in total, depending on how hard I press the jaws of my micrometer. But as my micrometer only reads to 0.1 mm, it's hard to tell gauge it actually is.

For most of the connections, I used the multi-strand (for better flexibility and strength), except the loop connecting the negatives of A and X (thin enough to have it folded over in the gap between the buttons, so they can move independently of each other without pulling on the soldered joints):
https://postlmg.cc/7Cg3qFqV

The LEDs slot into the coloured parts of the buttons, with their legs bent to come out horizontally though gaps in the tabs that keep the buttons in the right orientation. I have left a mm or two of leg clear, which I have looped the connecting wire round and soldered. I need to keep the remaining legs short so they don't hit the outer edge of the channels in the front shell, but this doesn't leave me much room to get a good solder joint. I thought it would be better to have the rigid legs going through the tabs rather than cutting them even shorter and having flexible wires passing through the tabs and connecting to the legs within the buttons.


I have wires coming round the top (X, Y, - for A and X), side (A, B) and top outer corner (- for B, - for Y) of the board, partly to minimise the run of wires needed between the buttons and the rubber pad beneath, and partly because I now have them individually controlled - my previous parallel-connected version had wires from A and X running diagonally to the corner and I had difficulty getting everything to lie flat enough not to interfere with button presses.

Can you recommend what gauge of wire I should use, muti- or single-strand? Where do you route the wires? Where can you include extra slack length so the buttons can move without pulling on the joints? Would you recommend having the solder joints inside the buttons rather than in the channel around them?


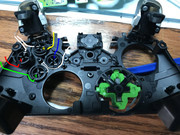
Update: I have used more of the thin wire and rerouted the cables:


« Last Edit: August 14, 2020, 07:38:45 AM by emcintosh »

Offline Smokingun

  • Guppy
  • *
  • Posts: 1
  • Post quality +0/-0
  • Gender: Male
  • Acidmods User
Re: xbox one lighting mods
« Reply #37 on: August 13, 2021, 12:54:45 AM »
I was wondering what the j2 to j3 and j3 to j10 connects are for. I was trying to lift the wire off the connector and the entire connector came with it. I assume it is a radio connection for bluetooth, but bluetooth (I think) still worked disco'd. Thanks in advance.


SMF spam blocked by CleanTalk
SimplePortal 2.3.5 © 2008-2012, SimplePortal